3.1 The Data Analysis Process
The Data Analysis Process is divided into 5 steps:
- Question
- Wrangle
- Explore
- Draw Conclusions
- Communicate
This view it is the same presented by Roger Peng in Managing Data Analysis (a course of Executive Data Science Specialization), the next table shows a comparison between both:
Table 1 - Comparison between methods
| Step | Juno Lee | Roger Peng** |
|---|---|---|
| 1 | Question | Stating and refining the question |
| 2 | Wrangle | Exploring the data |
| 3 | Explore | Building formal statistical models |
| 4 | Draw Conclusions | Interpreting the results |
| 5 | Communicate | Communicating the results |
(**): Part of this table was extracted from the Coursera website.
The Figure 1 shows a summary of each step (this picture was picked from the book of Roger Peng called Art of Data Science).
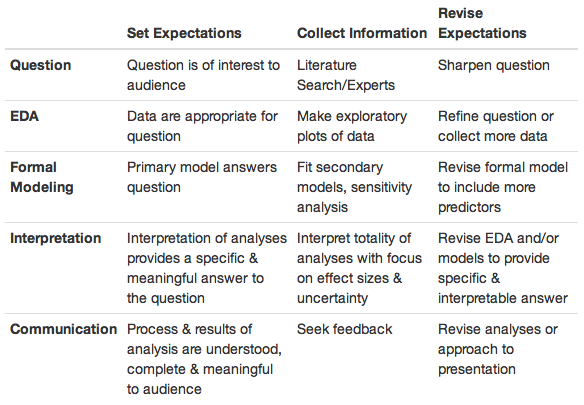
Figure 1
Although the process has divided into 5 step, these step are not statics and usually this is not a linear from 1 to 5. There are a lot of iterations until the last step.
3.1.1 Step 1 - Ask a Question
Usually all the analysis starts based on a question (good one), which we would like to answer using data. Sometimes we already have these data and we need to “think” what is a good question to this data (probabily later you’ll need more data). Generally, you do not have data but you have a question and you’ll need to find a good data set. This question must have 5 features:
- Interest
- Answerable
- Specific
- Pausible
- Not already answered
Keep in mind that the question must be specific. If the question is not specific, we must refine it.
3.1.2 Step 2 - Wrangle
This step is quite different from the Roger one, because here we deal with:
- Gathering: If you do not have data you need to find it;
- Download from the database stored in the webs;
- API
- Web Scraping
- Assess: Assess the quality of the data and the structure.
- Structural problems: Different files with same information, but distincts column names
- Missing data
- incorrect data type
- duplicates
- Clean: Modifying the data to ensure the quality.
All this steps were to prepare the data to an analysis.
Sometimes Wrangling and EDA are binded into one step, but here are splited.
3.1.3 Step 3 - EDA
Here we perform the EDA (Exploratory Data Analysis), discover some patterns, relationships, descriptive analysis, maximize the potential of the analysis, visualizations, and models. Also, removing outliers, and creating new descriptive features from existind data.
- Exploring
- Augment
In this step usually we need to revisit the question and refine with the knowledge gathered (change the question or need more data).
3.1.4 Step 4 - Draw Conclusions
This is step was to predict something (machine learning or inferencial statistics).
3.1.5 Step 5 - Communicate
Communicate the results.
3.1.6 Packages
In this course, three packages will be used massively.
- Numpy
import numpy as npConvention: Abbreviate numpy as np.
- Pandas
import pandas as pdConvention: Pandas numpy as pd.
- matplotlib
import pandas as pd
% matplotlib inline
3.1.7 Methods
Methods used during the course videos.
3.1.7.1 read_csv()
df = pd.read_csv('student_scores.csv')
df = pd.read_csv('student_scores.csv', sep=':')
Import the dataframe.
3.1.7.2 .head()
df.head()Show the first 5 rows
3.1.7.3 .shape
df.shape()Prints the dimenions.
3.1.7.4 .dtypes
Prints the types of each variable.
3.1.7.5 .info()
Display a summary of each variable.
It is good to find missing values.
3.1.7.6 .nunique()
Return the number the unique values.
3.1.7.7 .describe()
This is a real summary.
3.1.7.8 .tail()
The last 5 rows.
3.1.7.9 loc and iloc
Selecting the columns using names.
df_means = df.loc[:,'id':'fractal_dimension_mean']Subsetting columns from “id” to “fractal_dimension_mean”.
Same range of columns but using index.
# repeat the step above using index numbers
df_means = df.iloc[:,:11]
3.1.7.10 .duplicated()
Return a boolean vector., which could be useful to count the number of duplicated.
3.1.7.11 .drop_duplicated()
Show the data set cleaned without duplicated, but do not update the original dataframe to do it so you need to set inplace as True.
- inplace = True
3.1.7.12 .mean()
df["desired_column"].mean()Mean function.
3.1.7.13 .fillna(X)
Fill the NA with X.
- Alternativaly you can add inplace to update the current dataframe.
3.1.7.14 pd.to_daytime(df['time'])
Update the object of time, but you need to assign to the dataframe columns to change it.
3.1.7.15 .hist()
data.hist()

data.hist(figsize = (8,8)) # Biger figures.

data['age'].hist() # For a specific variable/featues.
Plot a simple histogram, beware because if you have many feactures, the histogram going to be crowded.
3.1.7.16 .plot()
data['age'].plot(kind='hist'); # Different way to plot a hist()
data['age'].plot(kind='bar'); # Different way to plot a hist()
data['age'].plot(kind='pie',figsize= (8,8)); # Different way to plot a hist()

# Matrix
pd.plotting.scatter_matrix(data,figsize=(15,15))

# Scatter regular
data.plot(x = "compactness", y = "concavity" , kind = "scatter")

# Boxplot
data['concave_points'].plot(kind = "box")
3.1.7.17 value_counts()
Aggregates counts for each new unique value in a column. Shows a vector with this values.
data['something'].value_counts().plot(kind = 'bar'); # Creates a bar ploat based on the value_counts created before.3.1.8 Subsetting
data[data['anything'] == "M"] # data['anything'] == "M" -> will select each row with True.3.1.9 Indexing
# Example 1
ind = data['something'].value_counts().index
data['something'].value_counts()[index].plot(kind='bar') # Indexing!!

# Example 2
ind = data['anything'].value_counts().index
df['anything'].value_counts()[index].plot(kind='pie',figsize = (8,8))
A work by AH Uyekita
anderson.uyekita[at]gmail.com